
September 2, 2026 · 29 min read · Updated October 5, 2026
How to Build an Interior Design Portfolio
Three readers want different things from the same project. How to photograph a finished space, what before-and-after really requires, how much of the drawing package to show, and the credit line that keeps you honest about studio work.
An interior design portfolio has a problem that most other design portfolios do not. The work is a room. It has volume, temperature, acoustics, a smell, a sequence you experience by walking through it — and you have to compress all of that into a rectangle on someone's phone. Everything that makes the discipline good at what it does is exactly what does not survive the translation.
Which is why the single biggest variable in an interior design portfolio is not the design. It is the photography. Two designers of identical ability, one shooting handheld verticals on a phone at 4pm with the lamps on and the blinds half down, the other shooting square and level on a tripod in diffuse daylight after an hour of styling, will not read as equally good. They will not read as within two years of each other. That is unfair and it is also the environment you are working in, so this guide spends more time on how to photograph a finished space than most portfolio advice spends on anything.
In short, to build an interior design portfolio you choose six to ten projects, lead each one with properly photographed finished rooms, put the technical evidence one scroll below, credit your role honestly, and keep both a website and a PDF. The step-by-step version comes first below. The rest of it is about the parts of this discipline that generic portfolio advice cannot reach: the three quite different audiences reading the same project, how much of the technical work — schedules, elevations, sample boards — to show and where to put it, what to do when everything you have is renders or student work, and the credit line that separates designers who are trusted by other professionals from designers who are quietly not. That last one is the field's biggest integrity trap and it is worth reading even if you skip the rest.
How to build an interior design portfolio, step by step
Here is the whole process in order. Every step has its own section further down; this is the version to keep open while you work.
- Decide who it is for first. A studio that is hiring, a private client and an academic or membership review read the same project for different things. Pick the reader you most need this year and order everything for them. The next section explains what each one is looking for.
- Choose six to ten projects, and the two or three you will open up. Start with the work closest to what you want to do next, not with your oldest or biggest job. Separate residential from commercial rather than mixing them.
- Gather the evidence for each project before you lay anything out. Finished photographs, a before shot from the same position, the brief, the measured survey, one concept or mood board, an annotated plan or elevation, the material board, and a schedule extract with prices and supplier codes removed.
- Fix the photography. Reshoot what you can: tripod, level camera, straight verticals, one kind of light, an hour of styling first. Pay a photographer for the project that will lead your portfolio for the next couple of years.
- Write the words for each project. A one-line brief (client type, scope, floor area, your role), a sentence on the idea, and a credit line naming the practice, your role and your scope on any studio work. Label renders, student projects and unbuilt schemes as such in the first line.
- Get the permissions. Written agreement from each homeowner, from the photographer for each image, and from the practice for work you did there. Do this before publishing, not after.
- Build the website, then cut the PDF from it. One page per project on the site, so you can send a client the single project that matters to them. Then a landscape PDF of five or six projects, under about ten megabytes, reordered for each application.
- Run the audit. Open it on a phone, on mobile data, and work through the pre-send checklist at the end of this guide.
If you have no built work yet, steps two and three change: the section on renders and student work covers what to use instead and how to label it.
Three audiences want different things from the same project
Most interior designers build one portfolio and send it everywhere. That is fine as a starting position — but only if you know that at least three distinct readers are going to open it, and that they want almost nothing in common.
A studio that is hiring is reading for competence on a team. They already assume you have taste, because everyone applying has taste. What they cannot assume is whether you can draft, whether your dimensions add up, whether you have ever produced an FF&E schedule that a procurement person could actually order from, whether you understand a construction programme, and whether you can take direction on somebody else's concept without sulking. They will look at your finished photographs for about the time it takes to decide you are not embarrassing, then go hunting for the drawings.
A private client is doing the opposite. They are not qualified to read your elevations and they are not going to try. They are looking for a room that resembles the life they want, and underneath that they are answering one question: would I trust this person in my house for four months. Plans and schedules do not help them; consistency, calm, and evidence of finished, real, lived-in rooms do. So does an About page that reads like a human being — ours on writing a portfolio About page covers that side of it.
Academic and credential-adjacent review is the third, and it is the one most misdescribed online. A degree programme's entry or exit review, a graduate scheme, a mentor assessing you for professional membership — these read for process, rigour and evidence of a method. Worth being precise here, because a lot of portfolio advice implies otherwise: the NCIDQ examination is assessed on education, documented work experience and the examinations themselves, not on a portfolio, and the BIID sets out its own criteria for its membership grades. Check either body's current requirements at source rather than through a summary — including this one. Your portfolio is what gets you the job that generates the documented experience. It is not the credential.
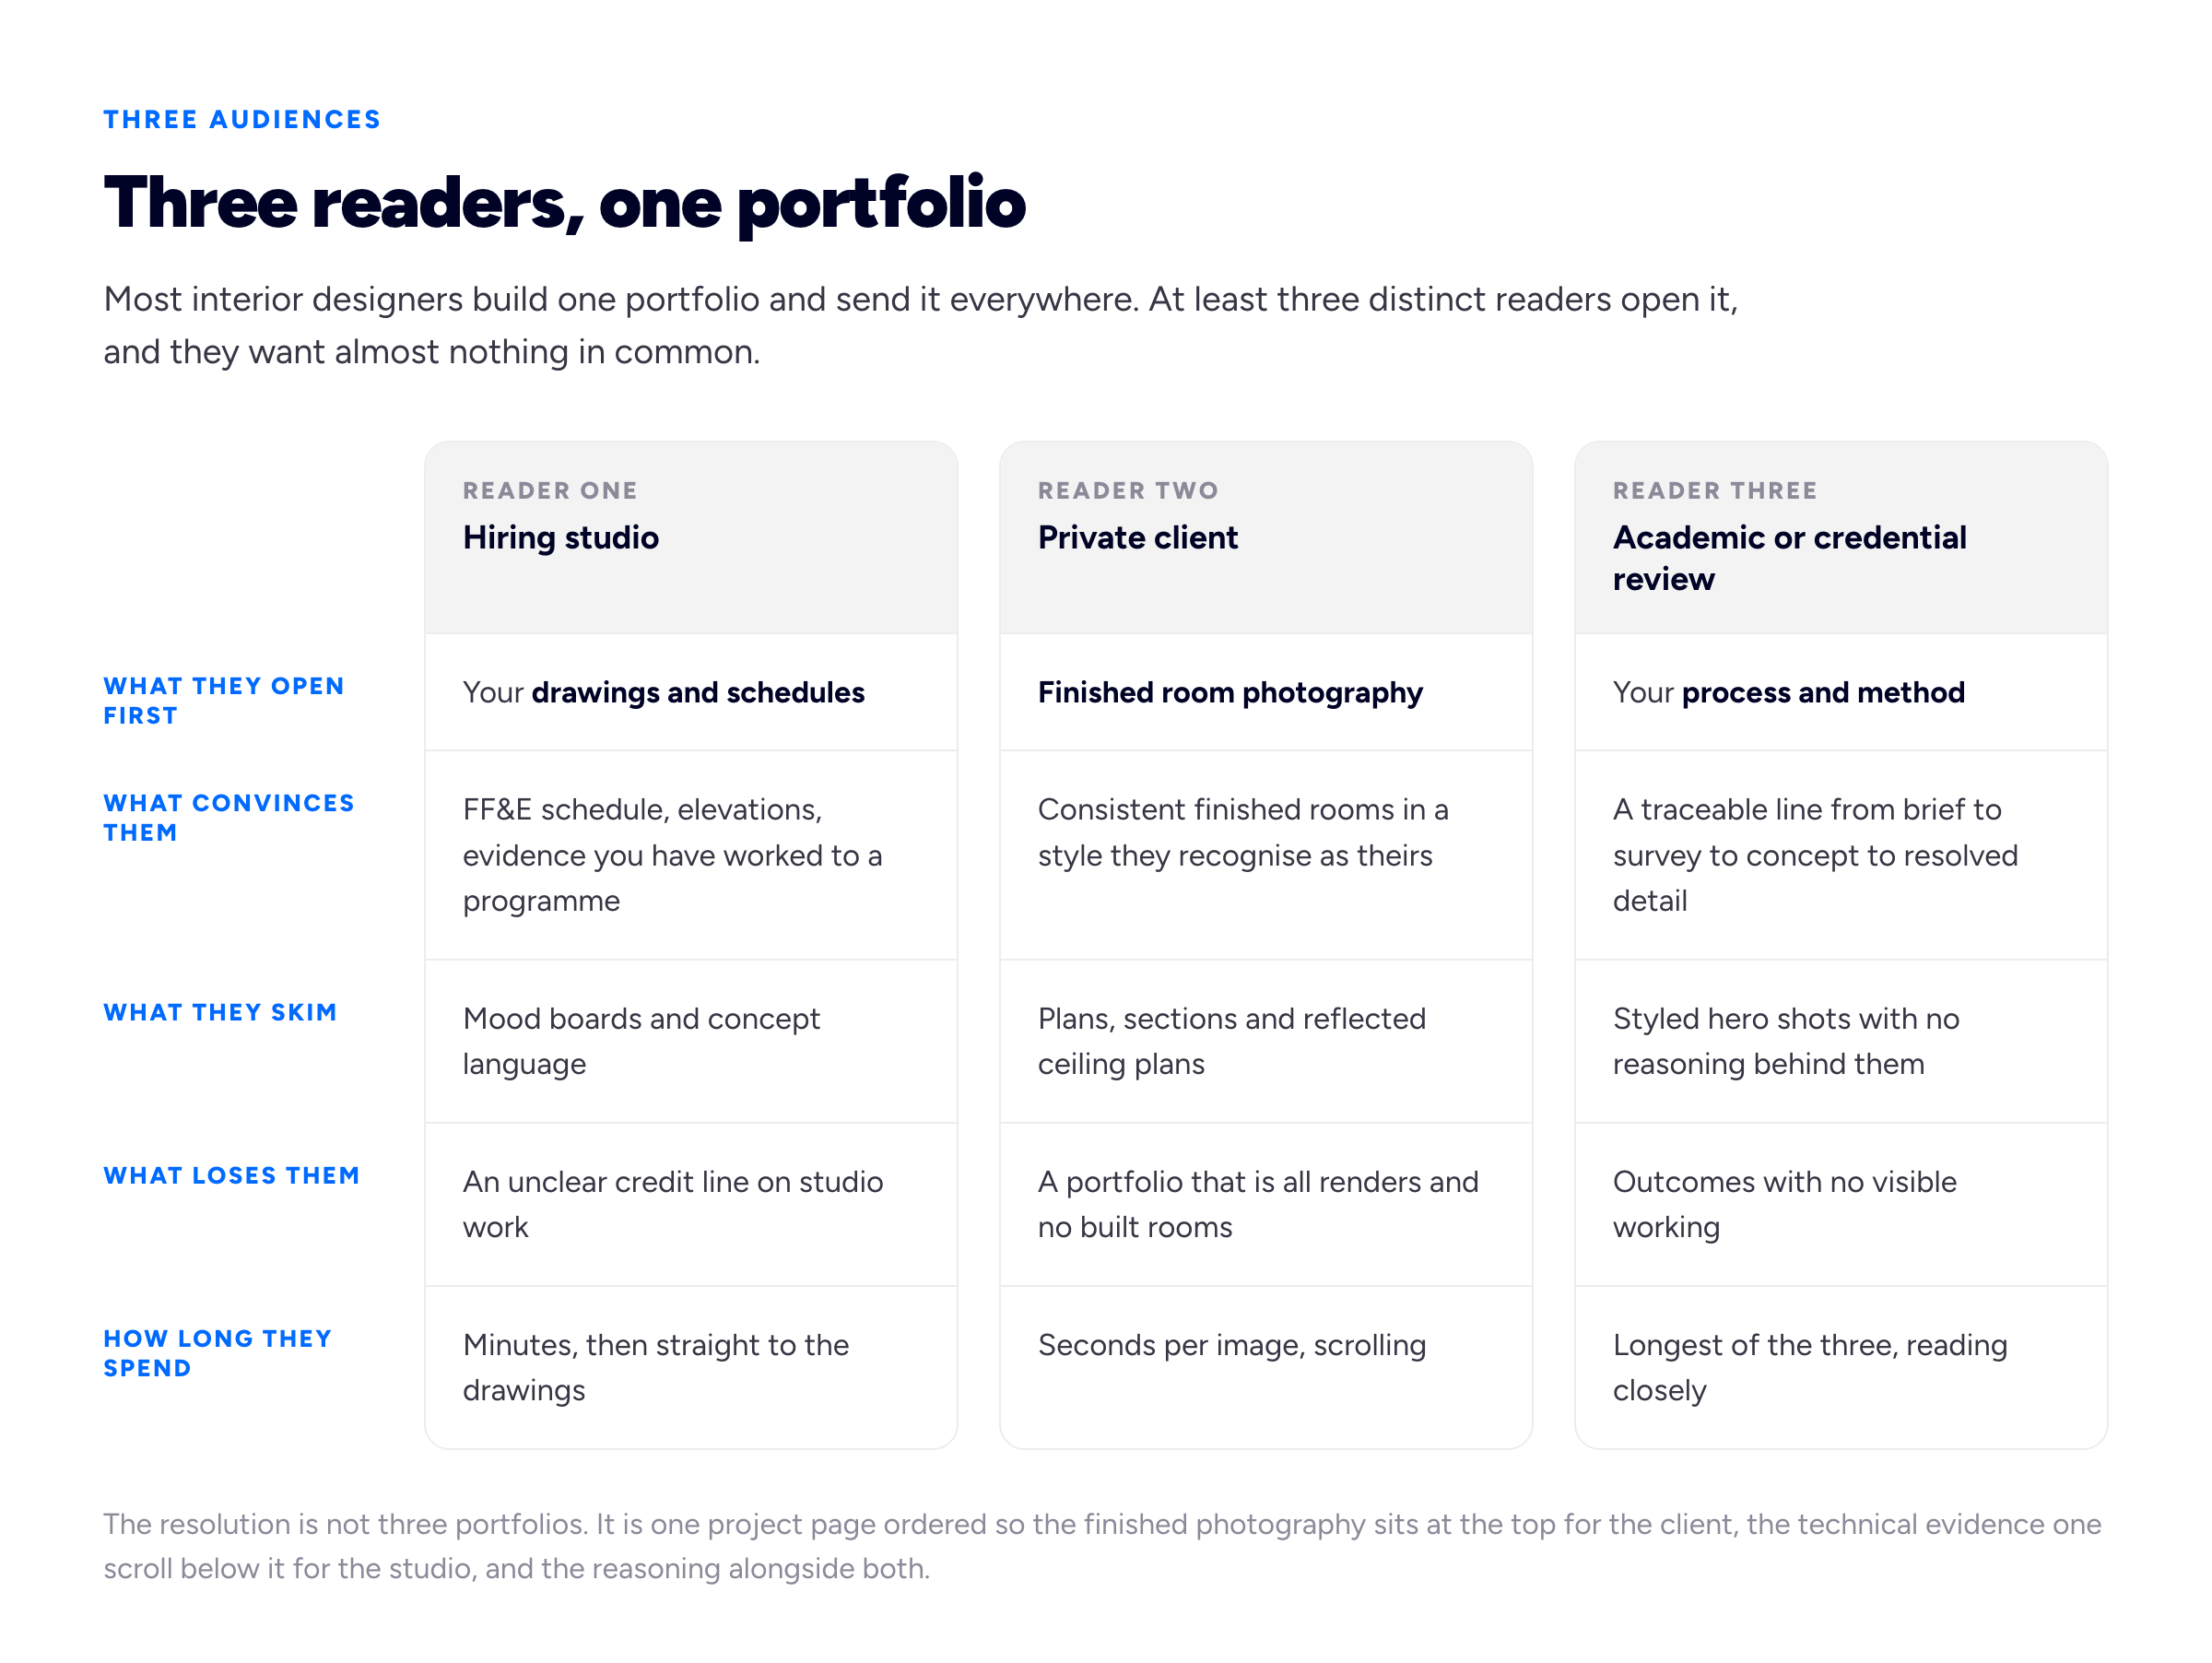
The same project has to answer three different questions. Sequence it so each reader finds theirs quickly.
The practical resolution is not three portfolios. It is one project page ordered so that the finished photography is at the top for the client, the technical evidence is one scroll below it for the studio, and the reasoning sits alongside both. Nobody has to wade through material meant for someone else, and nothing is hidden.
Photography is the whole game
Interiors punish casual photography more than almost any other subject, for reasons that are optical rather than a matter of skill.
Verticals converge. Point a camera even slightly upwards or downwards in a room and every vertical line — door frames, wall junctions, the edges of joinery, curtain drops — leans inward at the top. Your eye corrects for this in life; the photograph does not. A converging frame reads as amateur immediately even to people who cannot name what is wrong with it, and in a discipline built on straight lines it is fatal. The fix is mechanical: camera dead level, sensor plane parallel to the wall you are shooting, tripod at roughly chest height, and correct any residual lean afterwards in software.
Phone lenses distort at the edges. The ultra-wide setting that finally fits the room in is also the one that bows the far corners, stretches whatever is nearest the lens into a caricature of itself, and makes a 3.2-metre room look like a corridor. Wide is not the same as spacious. A slightly tighter frame with a considered composition sells a room better than a distorted one that includes all four walls.
Mixed light ruins colour. A typical interior at dusk contains daylight through the window, warm LED downlights, a tungsten table lamp and possibly a cool strip in the kitchen. Every one of those is a different colour temperature, no single white balance corrects all of them, and the result is a photograph where your carefully specified greige reads green on one wall and pink on the next. Shoot in one dominant light source wherever you can: overcast daylight with all the artificial lighting off is the easiest reliable condition there is.
Phone HDR flattens everything. Automatic processing lifts the shadows, pulls back the highlights and hands you a technically legible image with no depth at all — which is a problem, because depth and the fall of light are most of what a designer is being judged on. If you can shoot raw or bracket exposures manually, do.
Two more rules that cost nothing. Shoot at about eye level when seated, roughly 1.2 to 1.4 metres — standing height looks down on the furniture and makes rooms feel small. And compose either dead-on one-point or a clean two-point corner, not the vague forty-degree angle that phones drift into. Interiors reward geometry.
Style the room before you touch the camera
The hour before the shoot changes the images more than the camera does. Cables and chargers out of frame. Bins, cleaning products, remote controls, dish racks, phone on the counter — gone. Cushions and throws actually arranged rather than dropped. Bed linen steamed, not just pulled straight. Art hung level and books de-branded or turned. Something living: flowers, a bowl of fruit, a plant that is not dying.
Then cut about a fifth of what remains. A photographed room needs less in it than a lived-in one, because the frame edge does the compressing for you. And check the sightlines — stand where the camera will stand and look at what is visible through the doorway behind you, because that is where the ironing board always is.
When to pay a photographer
Our working threshold: pay for photography when the project is going to lead your portfolio for the next two years, or when it is commercial and the client wants images too. Everything else can be shot competently by you, once you have the tripod discipline above.
The commercial case is the easy one, because the cost is shareable. A restaurant, a clinic, a hotel or a workspace client needs photography for their own marketing anyway; agreeing a joint commission at project outset splits the fee and gets you images at a standard you could not produce yourself. The thing to settle in writing at the same time is usage: who may publish the images, where, for how long, and whether you may use them in a portfolio and in pitches. Photographers retain copyright in their work by default in most jurisdictions, so a licence covering your portfolio use is a thing you ask for, not a thing you assume. Ask at the contract stage, when it is free, rather than eighteen months later when it is a favour.
The shot list for one room
Four frames, not forty:
- The establishing wide — square, level, showing the spatial move you made. This is the image the whole project gets judged on.
- The reverse angle — shot back the other way. It proves you designed a room rather than a wall, and it is the shot amateurs never take.
- The vignette — a corner, a seating group, a run of joinery. Where the styling earns its keep.
- The material detail — the stone edge profile, the tile junction, the joinery reveal, the fabric weave. This is the one that tells another professional you specified rather than shopped.
Before and after is the strongest format in this discipline
Almost every design field struggles with the problem that a viewer cannot really judge whether the work is good. Interiors has a way out that the others do not: the starting condition is usually ugly, always real, and inherently comparable. Put the before beside the after and taste becomes a comparison, and comparisons are decidable by anyone.
It is also the format that best answers the private client's actual anxiety, which is not "is this designer talented" but "could my house look like that". A finished room by itself is aspirational. A finished room next to a photograph of a space as awkward and unpromising as theirs is evidence.
Doing it properly requires one habit and it is the habit almost nobody has:
- Shoot the before deliberately, on day one, from the position you will shoot the after from. Tripod, same height, same focal length, same orientation, all four rooms, before anything moves. It takes an hour and you can never go back for it. Photograph the plan, the meter cupboard and the awkward structural bit while you are there, too.
- Do not sabotage the before. Shoot it in the same light, not deliberately dim and grim. A rigged comparison is obvious and it makes the after look less impressive, not more, because the viewer stops believing the frame.
- Say what actually changed. Two lines. Whether you moved a wall, moved services, or changed nothing structural and did it all with finishes, layout and light. Designers who are honest that a transformation was cosmetic gain credibility rather than lose it — a client whose budget is cosmetic has just found the right person.
- Match the crop. Two images at different framings is not a comparison, it is two photographs.
One caution: get written permission before publishing anyone's home, including the before. Some residential clients will refuse outright, some will agree if you omit the address, the exterior and anything personal in shot. Ask at the start of the project, in the same conversation where you ask about photography, rather than at the end when the answer is a favour.
How much process to show, and where to put it
Interior design generates an unusual amount of intermediate artefact — concept boards, mood boards, sample boards, furniture plans, elevations, sections, reflected ceiling plans, lighting layouts, FF&E schedules, renders — and portfolios fail in both directions. Some show only glossy finished rooms, which reads as styling rather than design. Others open with eleven mood boards before a single photograph, which is a graduate portfolio wearing a professional's clothes.
The ordering rule is simple and it holds for every audience: the finished photograph goes first, always. Process below it, in the amount that proves a method rather than performs one.
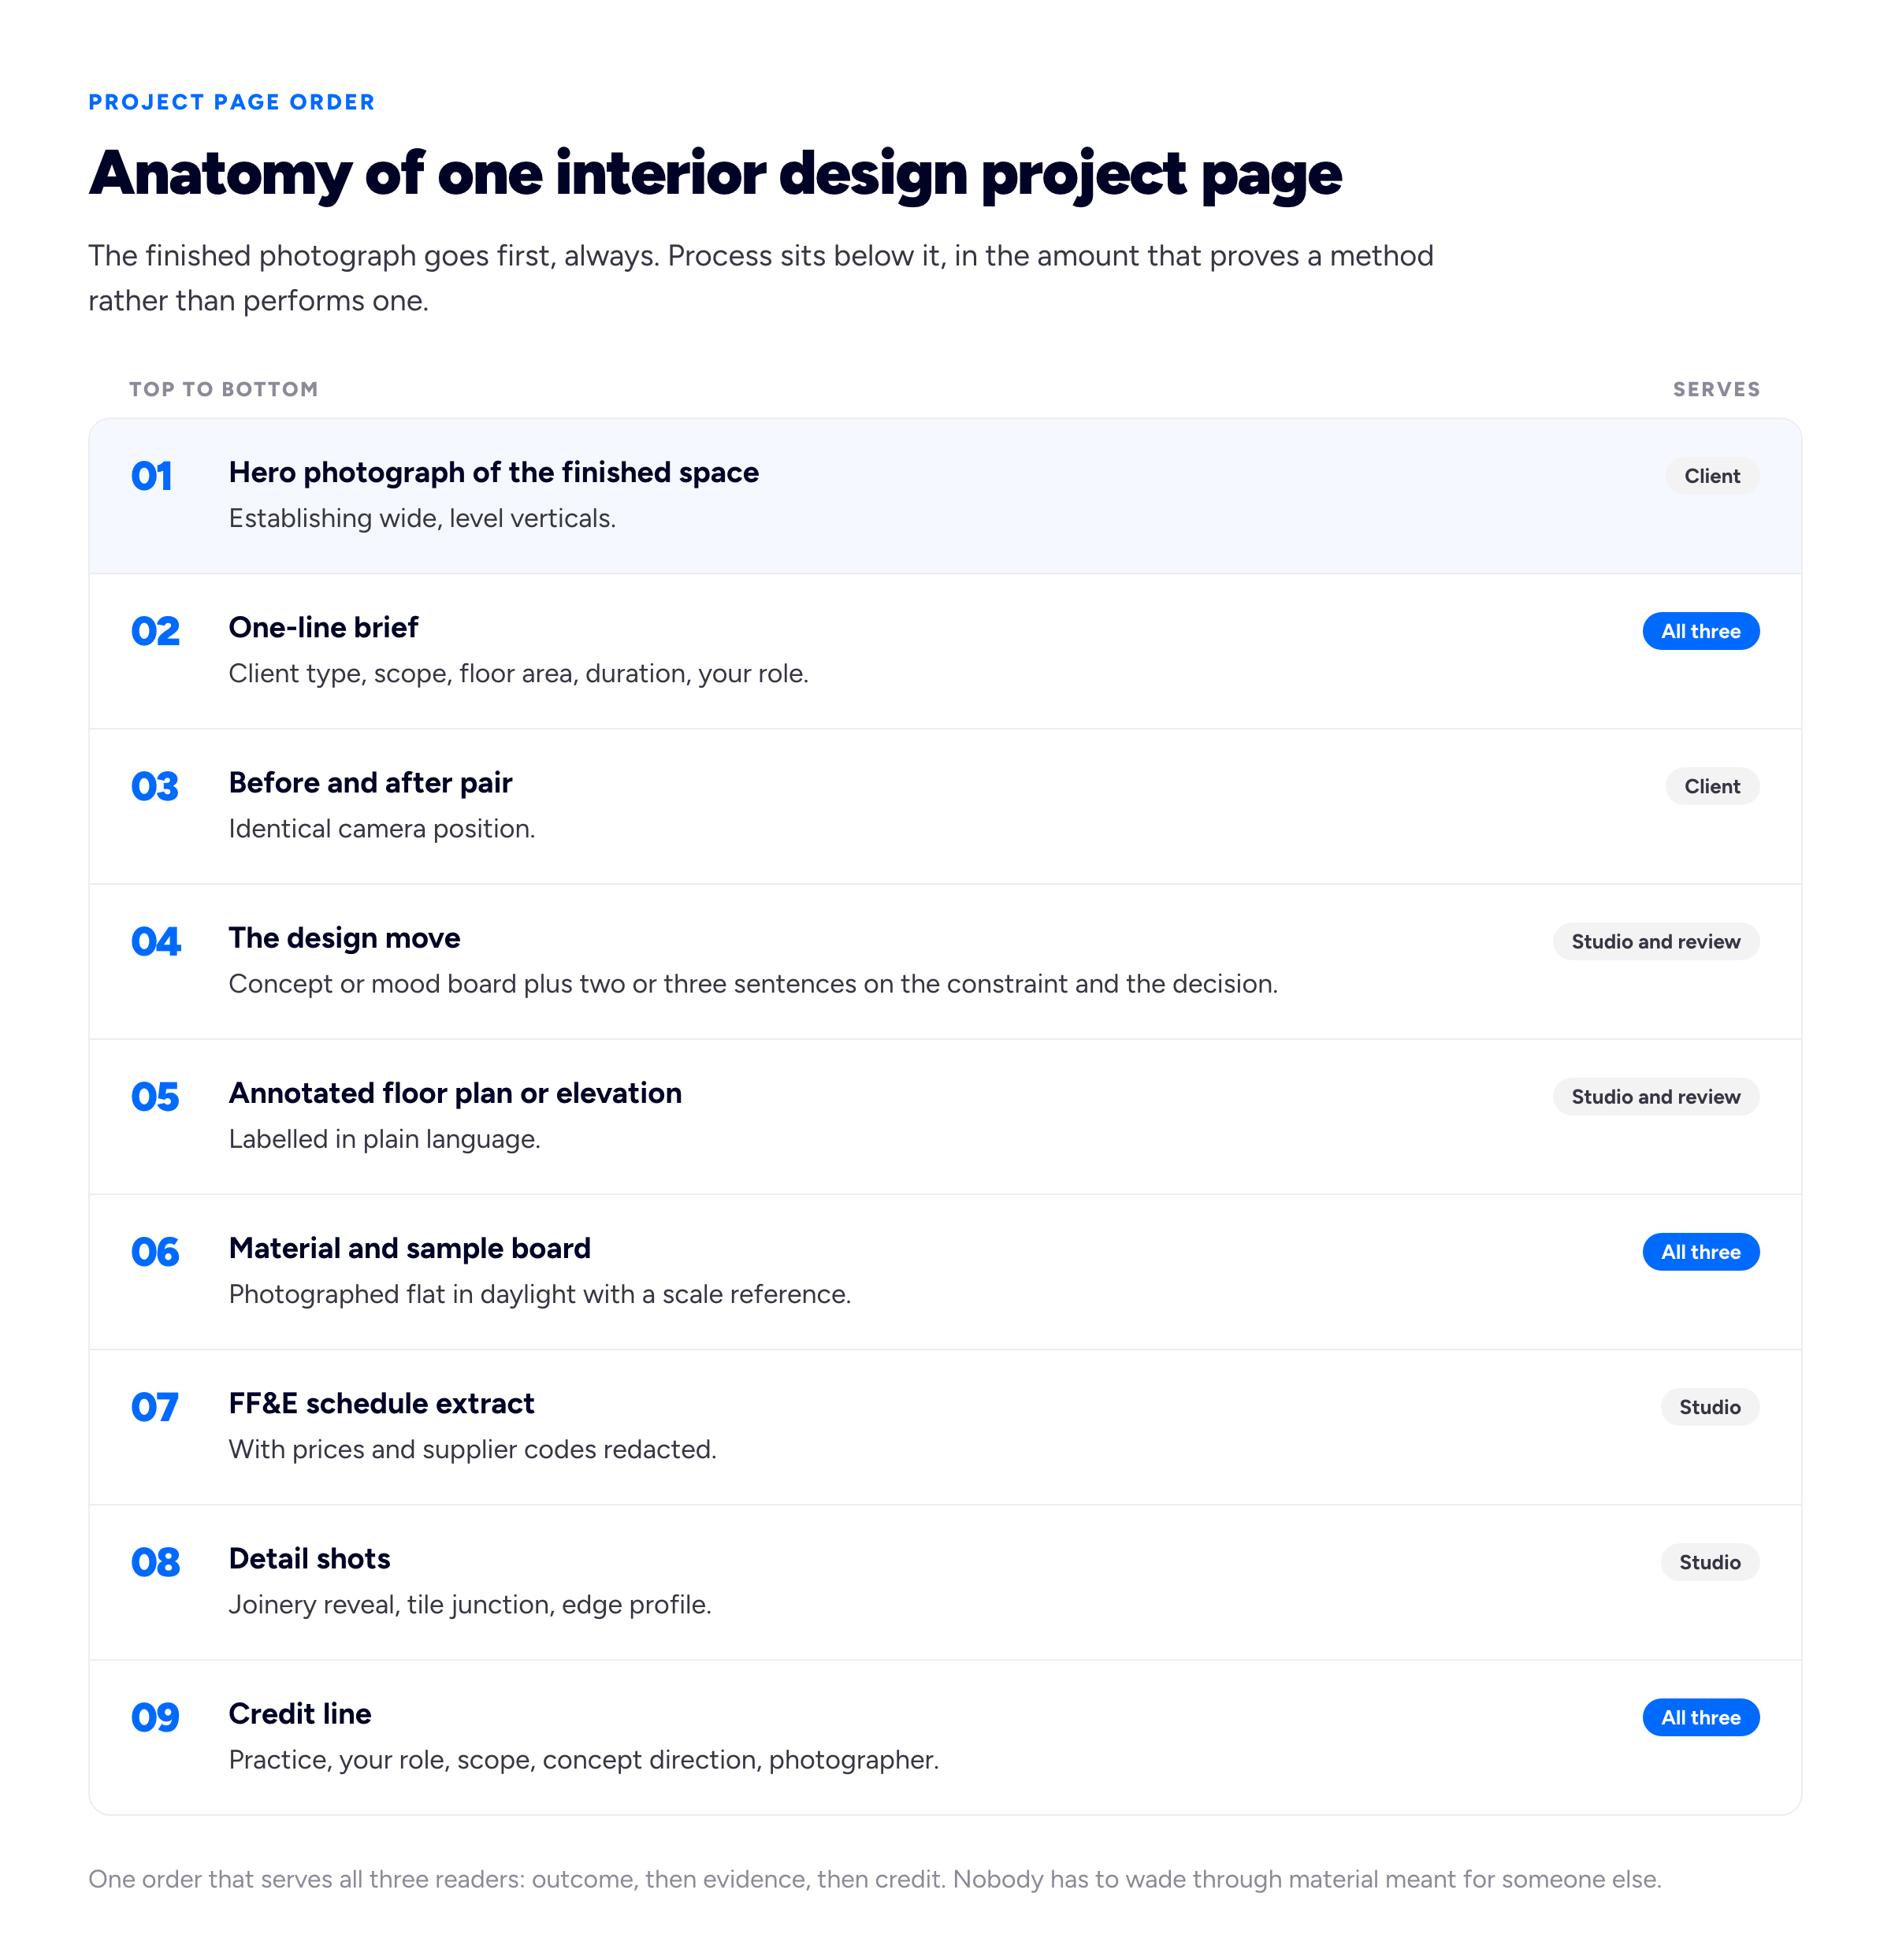
One order that serves all three readers: outcome, then evidence, then credit. Nobody has to wade through material meant for someone else.
What each artefact is actually worth:
Mood and concept boards prove you can hold a direction across a project. One per project, tight, with a sentence naming the idea in plain English. They do not prove competence — everyone can assemble a board — so they should never lead.
FF&E schedules are the single most underrated artefact in this field. A well-structured schedule showing item code, room, specification, finish, dimensions, quantity and lead time is the clearest possible signal that you have run a real project rather than decorated one, and hiring studios love it precisely because it is the boring part. Redact prices, supplier account numbers and client contact details, and show one page as an extract rather than the full document.
Plans, elevations and sections should appear once per project, annotated so a non-technical reader can follow them. An unlabelled ceiling plan communicates nothing to a private client and only slightly more to a hurried studio. Add a north arrow, a scale bar and three or four callouts in ordinary language.
Sample and material boards punch above their weight, because texture is what people respond to and photographs of rooms suppress it. Photograph the board flat, from directly above, in indirect daylight, with something for scale. Name the actual materials and suppliers where you can — specificity is the whole signal.
Renders are legitimate and they must be labelled. More on that next.
If you want one project opened right up — and you should have exactly one — the long-form structure is in our guide to writing a portfolio case study. One project taken properly apart plus five presented tightly is a better shape than eight half-explained ones.
When all you have is renders, or only student work
Nearly every interior designer starts here, and studios hiring juniors know it. Unbuilt work is not disqualifying. Unbuilt work presented ambiguously is.
Label every image for what it is, in the first line of the project, not in a footnote: "Concept, unbuilt", "Student brief, third year", "Visualisation — project on site, completion spring". A render presented in a way that hopes to be mistaken for a photograph is the fastest way to lose a room full of people who look at renders all day, and it takes the credibility of your genuine work with it.
Beyond labelling, four things make speculative work substantially more convincing:
- Use a real space with real constraints. Measure an actual room — a friend's flat, an empty unit on your high street, your own kitchen — and include the measured survey. A designer who has worked around a structural downstand, a bad window position and a 2.3-metre ceiling has demonstrated more than one who invented a warehouse loft with perfect light.
- Specify real products. Name the tile, the fabric, the light fitting, the supplier and the lead time. Anyone can render a beautiful sofa; specifying one that exists, is available and suits the budget is the actual job.
- Render honestly. Plausible light from the window that exists, plausible finish behaviour, no glow that no lamp produces. Restraint reads as experience.
- Get one small thing built. A single room, a rental refresh for a landlord, a market stall, a café corner, a friend's nursery — then photograph it with the discipline described above. One built and photographed room outweighs six renders, because it carries evidence that you survived contact with a budget, a builder and a delivery date.
E-design and single-room consultations are a useful shortcut here: the client installs it themselves, so you get photographs of a real installed scheme without running a construction project. Ask for them explicitly, at handover, while goodwill is high — the mechanics of that ask are the same ones in our guide to asking clients for testimonials, and it is worth requesting both in the same message.
Residential and commercial are not the same portfolio
Residential and contract work are read by different people against different criteria, and a grid that alternates between a family kitchen and a dental clinic tells both readers you are not really either.
Residential is emotional and specific. The reader is imagining themselves in the room. Show consistency of point of view across projects, show that you can work in more than one house size, and be careful about privacy — no addresses, no exteriors that identify a property, no family photographs left in shot.
Commercial and hospitality is a different literacy test. Operators and their project managers want evidence that you understand things residential work never asks about: accessibility and building regulations, fire performance of finishes, contract-grade specification and durability (fabric abrasion figures, commercial-rated flooring), acoustics, back-of-house and service routes, phasing work around trading hours, and procurement at volume. Say what the project had to do commercially and, where the client will let you, what happened — covers, dwell time, occupancy, a refit delivered in a two-week closure. That is the language the buyer thinks in.
If you genuinely do both, separate them into two clearly labelled sections rather than interleaving them, and lead with whichever you want more of next year. If you are trying to move from one to the other, put the two or three most relevant projects at the top and let the rest sit below; the ordering is doing the positioning work.
Crediting studio work without overclaiming
This is the discipline's biggest integrity trap, and it catches good people through vagueness rather than dishonesty. It is the same trap that catches architecture portfolios built out of office work, for the same reason: the project was delivered by a team, and a page that says nothing about credit is read as a claim to all of it.
Interior design is a team sport. A single completed hotel might involve a principal setting the concept, a project designer resolving it, someone specifying FF&E, a technician producing the drawing package, a procurement coordinator, a site-based designer handling variations, and an external lighting consultant. A portfolio that shows the finished bar and says nothing else is implicitly claiming all of it. The designer usually did not mean to claim all of it. The reader has no way to tell.
The fix is one line, placed before the images, in this order — practice, your role, your scope, what you did not do. An invented example of the format:
Studio: Marlow & Vance. Role: project designer. Scope: FF&E specification for guest rooms and lobby, joinery detailing, site coordination through fit-out. Concept direction by the practice principal. Photography: studio commission, published with permission.
Nothing in that costs you anything. A hiring studio reads "project designer, FF&E, joinery detailing, site coordination" as a real and useful set of skills — it is more informative than an unexplained photograph, not less. What loses you the job is the conversation where someone asks which parts you did and the answer turns out to be smaller than the page implied. This industry is small; the person reading your portfolio may well know the practice, and sometimes the project.
Three related permissions worth getting straight:
- Ask the practice before publishing. Many studios have a policy on former employees' portfolios, some require approval, and asking costs one email. A refusal is survivable; publishing over a refusal is not.
- Ask about the photography. Studio-commissioned images are usually licensed to the studio, not to you personally. Get permission in writing and credit the photographer on the page.
- Check any confidentiality terms attached to the client, which is common in hospitality, healthcare, workplace and high-net-worth residential work. Where a project cannot be named, describe it generically — "a 46-key boutique hotel in the north of England" — and show detail crops rather than identifying wides.
The PDF book and the website do different jobs
Interior design is one of the last design fields that still genuinely runs on PDFs, and portfolio advice that tells you the website replaces the book is wrong about this industry. Studio applications ask for an attachment. Pitch meetings want something on the table that a client can annotate. Recruiters forward files. You need both, and they are not the same document.
The PDF is a sequenced argument for one specific reader. It should be cut down and reordered for each application — five or six projects, not everything — with a cover, a contents page, the projects, a credits page and your contact details. Landscape, because that is how rooms are shaped and how it will be viewed. Under about ten megabytes so it does not bounce off a corporate mail server. Your website URL on page one and in the footer of every spread. Named properly: Firstname-Lastname-Portfolio-2026.pdf, never portfolio-final-v3.pdf.
The website is the permanent, complete, current version. It is the link in your email signature and your Instagram bio, the thing a private client finds when they search for a designer in your city, the place where a project can grow as it completes, and the address a studio director who saw your work eight months ago can find again by half-remembering your name. It is also the only one of the two that will still be current in a year, because nobody re-sends an old PDF to correct it.
Keep one master image library that both draw from, so the two never quietly disagree about which projects you have. On structure — how many pages, whether each project needs its own — see the pages a portfolio website needs and one-page versus multi-page portfolios. Interiors is one of the clearer cases for multi-page: individual project URLs are what you send to a specific client, and they are what gets found in search. If you want the site to bring in private clients directly, the local-search side is worth an hour of attention — our portfolio SEO guide covers it, including the image filenames and alt text that matter more here than in most fields, because interiors is a discipline people search for in pictures.
On volume: six to ten projects, two or three opened up properly, is a good target for either format, and the reasoning behind that range is in how many projects a portfolio should show. Fewer than four reads as thin; beyond about ten a reader stops believing the set was edited, and editing is part of what a designer is selling. If publishing the site is the part that has been stalling you, Bunfolio will host one on a free subdomain, which at least removes the excuse.
A pre-send audit
Open your portfolio on a phone, on mobile data, and answer each of these yes or no.
- Are the verticals straight in every finished-room photograph?
- Does every project open with a finished space rather than a mood board?
- Is there at least one before-and-after pair shot from the same camera position?
- Does every render, student project and unbuilt scheme say so in its first line?
- Does every project carry a credit line naming the practice, your role and your scope?
- Is there one FF&E schedule extract or drawing package visible somewhere, with prices and supplier codes redacted?
- Have you got written permission from the client for every home you have published, and from the photographer for every image?
- Are residential and commercial work separated rather than interleaved?
- Does the colour look the same across your images, or does the white balance jump between projects?
- Can a stranger tell in five seconds what kind of interiors you do and where you work?
- Is there a current PDF, under ten megabytes, with your website on page one?
- Is there a name, a face, a location and one obvious way to contact you?
Most portfolios fail four or five of these. Almost all of the failures are an afternoon's work rather than a rebuild.
Frequently asked questions
What does an interior design portfolio look like?
At project level: a finished photograph of the space first, a one-line brief naming the client type, scope, floor area and your role, a before-and-after pair, one concept or mood board with a sentence explaining the idea, an annotated plan or elevation, a photograph of the material board, a couple of detail shots, and a credit line. At portfolio level: six to ten projects in that format, grouped by residential or commercial, with the work closest to what you want next placed first. Consistent framing across all of them matters more than any individual image.
How do I create an interior design portfolio?
Decide who the main reader is, choose six to ten projects with the most relevant first, and gather the same evidence for each: finished photographs, a before shot, the brief, a concept board, an annotated drawing and a material board. Add a one-line brief and a credit line to every project, get written permission from clients and photographers, then build a website with one page per project and cut a shorter PDF from it for applications. The step-by-step section near the top of this guide has the full order.
How do I create an interior design portfolio if I have no built work?
Use real spaces with real constraints rather than imagined ones, include the measured survey so the render is anchored in a space that exists, specify actual available products with suppliers and lead times, label everything as unbuilt in the first line, and then get one small thing genuinely built and photographed — a single room, a rental refresh, a market stall. One built room does more than six renders because it carries evidence you survived a budget and a delivery date.
How many projects should an interior design portfolio include?
Six to ten, with two or three opened up in depth and the rest presented tightly. Below four it reads as thin; past ten a reader stops believing the set was edited. Order matters more than count — the project closest to the work you want next goes first, because a meaningful share of readers never reach the bottom.
Should my interior design portfolio be a PDF or a website?
Both, doing different jobs. The PDF is a delivery format you cut and reorder for each application — landscape, under ten megabytes, your URL on page one. The website is the permanent, complete, current version: the link in your signature, the thing private clients find in search, the address someone can return to. Neither replaces the other in this field, and the website is the one that stays correct.
Can I include work I did while employed at a design firm?
Usually yes, with three conditions: ask the practice first, check whether the client's terms restrict publication, and state your actual role and scope in a line before the images. "Project designer — FF&E specification and joinery detailing; concept direction by the practice" is more informative to a hiring studio than an unexplained photograph, and it removes the risk of a conversation in which your contribution turns out to be smaller than the page implied.
Do I need to pay a professional photographer?
Not for everything. Our threshold is to pay when a project will lead your portfolio for the next couple of years, or when it is commercial and the client needs images too — in which case a joint commission splits the fee. Everything else you can shoot yourself once you are working from a tripod, keeping the camera level so verticals stay straight, avoiding mixed light sources, and styling the room for an hour first. Whoever shoots it, agree in writing that you may publish the images in your portfolio.
Do I need an NCIDQ certificate or a degree for my portfolio to be taken seriously?
They are different things. A portfolio is evidence of what you can do; a credential is evidence that you met a body's requirements. The NCIDQ examination is assessed on education, documented work experience and the exams rather than on a portfolio, and the BIID publishes its own criteria for membership grades — check either at source, because requirements change. In practice the portfolio is what gets you the role that generates the qualifying experience, so it does not wait on the credential.
How do I show interior design work that is under an NDA?
Describe the project generically — "a 46-key boutique hotel in the north of England", "a private residence in west London" — and show detail crops, material boards and redacted drawing extracts rather than identifying wide shots or exteriors. If the terms prohibit even that, leave the project out and say in your About page that some work is not publishable; a client whose own project will be confidential reads that as reassurance rather than a gap.
How we put this guide together
Bunfolio builds portfolio sites, so we spend a lot of time looking at what designers publish and where those pages fail. The framework in this guide — the three-audience split, the ordering of a project page, the four-shot list per room, the threshold for when to pay a photographer, the six-to-ten project range and the position that before-and-after is the strongest format in this discipline — is our own recommendation, formed from that vantage point. Read it as judgement, not as findings. Someone running a large contract practice could reasonably order a project page differently, and would probably put the drawing package higher.
The photography section describes optics rather than opinion: converging verticals from a tilted sensor, edge distortion on very wide lenses, and the colour cast produced by mixing daylight with tungsten and LED sources are all predictable and checkable in your own camera roll this afternoon. The specific numbers we give — a camera height of roughly 1.2 to 1.4 metres, cutting about a fifth of the styling, a ten-megabyte ceiling for an emailed PDF — are working defaults we recommend, not measurements from a controlled test, and we have flagged them as ours rather than dressing them up.
Where we touch on credentials we have linked the primary source rather than paraphrasing a summary: the Council for Interior Design Qualification, which administers the NCIDQ examination, and the British Institute of Interior Design. Requirements at both change over time, so check them directly rather than trusting any article — including this one. Nothing here on copyright, image licensing, confidentiality or client permissions is legal advice; photography rights and NDA terms vary by jurisdiction and by contract, and anything with money attached is a question for a lawyer where you practise.
We have not quoted a statistic anywhere in this guide, and that is deliberate. There is a lot of confident numerical writing about design portfolios in circulation — percentages of hiring managers who do this, seconds a reviewer spends doing that — and when we have tried to trace those figures they have led to another article rather than to a study with a stated method. We would rather tell you that we could not source a number than repeat one we cannot stand behind. Where we describe how a reader behaves, that is an observation offered as one.
Every studio name, project, credit line and quoted example in this guide is invented for illustration. There is no Marlow & Vance, no 46-key hotel and no real designer behind the example credit; they exist to show the shape of the wording. We have also deliberately not named, ranked or reproduced any real designer's portfolio — interior design portfolio examples are worth studying for their structure, and we are not in a position to publish judgements about individual practices' work.
Related reading: how to write a portfolio case study for the project you open right up, building a photography portfolio website for more on image export and gallery editing, building an art portfolio website for the curation and captioning side, and the fashion design portfolio for another discipline where the PDF book still matters.
More from the blog

July 20, 2026 · 25 min read
How to Build a Graphic Design Portfolio
Your portfolio is itself a work sample. Four shots that present a project properly, where to publish besides your own site, and the image weight that quietly ruins design portfolios.
September 25, 2026 · 15 min read
How to Start Freelancing With No Experience: Build Proof, Not Years
Clients do not hire years of experience; they hire evidence that you can do their job. How to pick a skill someone will pay for, manufacture honest proof, package it on one page with a first price, fi...
September 21, 2026 · 18 min read
Nursing Portfolio: What to Include, Who Reads It and How to Build One
An interview panel, a clinical ladder committee, a certification auditor and an NMC confirmer all read a nursing portfolio, and only one of them wants the binder every guide describes. What each actua...